How To Make An Invisible Crochet Decrease And Increase?
Learn how to make invisible crochet decreases and increases with our comprehensive guide. Enhance your crochet projects with these essential techniques for a seamless, professional finish.
Author:Buttskin FamilyReviewer:Caden SteelheartJul 19, 2024123 Shares122.8K Views
Crocheting is a versatile and creative craft that allows you to make beautiful and functional items. As you advance in your crocheting skills, you will encounter techniques that enhance the aesthetics and functionality of your projects. One such technique is the invisible crochet decrease and increase. These methods ensure your work looks smooth and seamless, which is especially important for projects like amigurumi, clothing, and accessories. This comprehensive guide will teach you everything you need to know about making invisible crochet decreases and increases.
Understanding The Basics
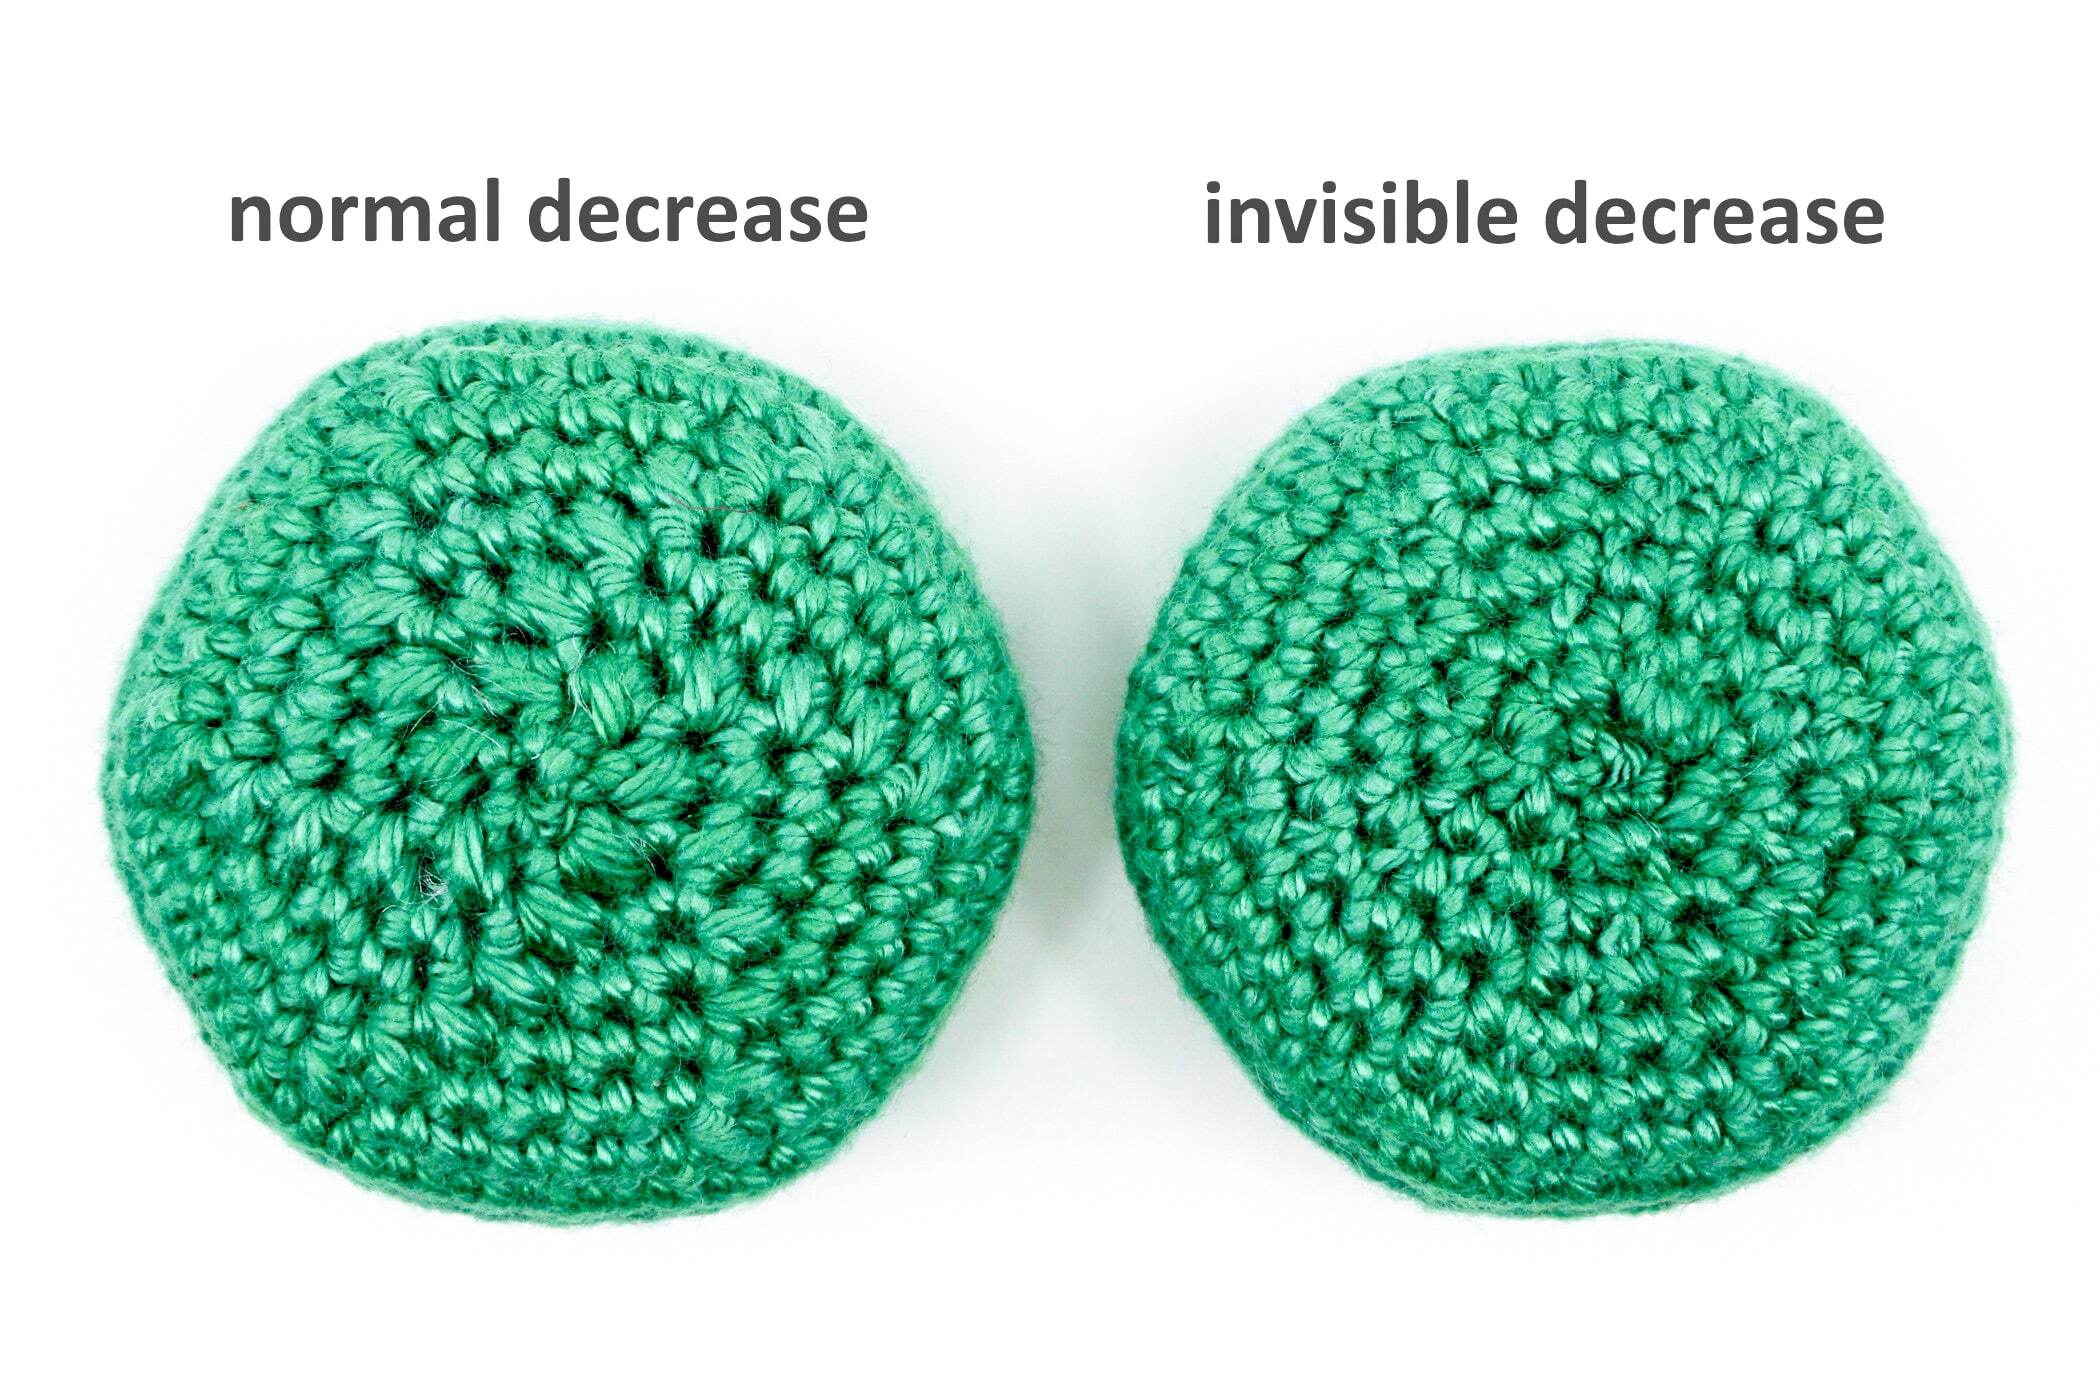
What Is An Invisible Crochet Decrease?
An invisible crochet decrease is a technique used to reduce the number of stitches in your work without creating noticeable gaps or bumps. This method is particularly useful in amigurumi and other projects where a clean, professional look is desired.
What Is An Invisible Crochet Increase?
An invisible crochet increase is a technique used to add stitches in a way that blends seamlessly with the surrounding stitches. This method helps maintain the shape and integrity of your crochet project while avoiding unsightly holes.
Why Use Invisible Decreases And Increases?
Aesthetics
Invisible decreases and increases provide a cleaner, more professional look to your projects. They help maintain the uniformity of the stitch pattern, which is crucial for items like amigurumi, garments, and accessories.
Structural Integrity
Using these techniques can improve the structural integrity of your crochet items. Invisible decreases and increases distribute the tension more evenly across the stitches, reducing the risk of holes or uneven stitches.
Versatility
Learning these techniques adds to your skillset and allows you to tackle more complex patterns with confidence. Whether you’re working on a tightly stitched amigurumi or a delicate lace project, invisible decreases and increases can be incredibly useful.
Materials Needed
To practice invisible crochet decreases and increases, you will need the following materials:
- Yarn: Any type of yarn you’re comfortable with.
- Crochet hook: The appropriate size for your chosen yarn.
- Stitch markers: To keep track of your stitches and pattern.
- Tapestry needle: For weaving in ends.
- Scissors: To cut your yarn.
How To Make An Invisible Crochet Decrease
Step-by-Step Guide
- Insert Hook into Front Loop of First Stitch:
- Insert Hook into Front Loop of Second Stitch:
- Yarn Over and Pull Through Both Front Loops:
- Yarn Over and Pull Through Both Loops:
Tips For Invisible Decreases
- Practice:Like any new technique, practice makes perfect. Try making invisible decreases on a swatch before incorporating them into your projects.
- Tension:Keep your tension consistent to ensure that the decreases blend seamlessly with the surrounding stitches.
- Count Your Stitches:Use stitch markers and count your stitches regularly to avoid mistakes.
How To Make An Invisible Crochet Increase
Step-by-Step Guide
- Insert Hook into the Stitch:
- Yarn Over and Pull Through:
- Yarn Over and Pull Through Again:
- Insert Hook into the Same Stitch Again:
- Repeat Steps 2 and 3:
Tips For Invisible Increases
- Even Spacing:Ensure your increases are evenly spaced to maintain the shape of your project.
- Consistent Tension:Keep your tension consistent to avoid holes or uneven stitches.
- Use Markers:Stitch markers can help keep track of where your increases should be, especially in complex patterns.
Applications Of Invisible Decreases And Increases
Amigurumi
Invisible decreases and increases are particularly useful in amigurumi, where maintaining a smooth and even fabric is crucial. These techniques help avoid gaps and lumps, resulting in a more polished finished product.
Garments
In garment construction, invisible increases and decreases can be used to shape the fabric without disrupting the overall pattern. This is essential for creating well-fitting, professional-looking clothing.
Accessories
For accessories like hats, gloves, and bags, these techniques ensure that the shaping is subtle and seamless. This can make a significant difference in the finished look and durability of the item.
Common Mistakes And How To Avoid Them
Mistake: Incorrect Loop Placement
Solution:Ensure you are inserting your hook into the correct loops for both decreases and increases. For invisible decreases, use the front loops only. For increases, make sure both single crochets are placed in the same stitch.
Mistake: Inconsistent Tension
Solution:Pay close attention to your tension throughout the project. Practice maintaining consistent tension, and adjust your grip or hook size if necessary.
Mistake: Losing Track Of Stitch Count
Solution:Use stitch markers and count your stitches regularly. This helps ensure that your decreases and increases are placed correctly and that your stitch count remains accurate.
Practice Patterns
Simple Amigurumi Ball
Materials:
- Yarn of choice
- Appropriate crochet hook
- Stitch markers
- Stuffing
Pattern:
- Round 1:6 single crochets in a magic ring. (6 stitches)
- Round 2:2 single crochets in each stitch around. (12 stitches)
- Round 3:1 single crochet, invisible increaserepeat around. (18 stitches)
- Rounds 4-6:Single crochet in each stitch around. (18 stitches)
- Round 7:1 single crochet, invisible decreaserepeat around. (12 stitches)
- Round 8:Invisible decrease in each stitch around. (6 stitches)
- Finish:Fasten off, leaving a long tail. Stuff the ball and sew the opening closed.
Simple Beanie
Materials:
- Yarn of choice
- Appropriate crochet hook
- Stitch markers
Pattern:
- Round 1:6 single crochets in a magic ring. (6 stitches)
- Round 2:2 single crochets in each stitch around. (12 stitches)
- Round 3:1 single crochet, invisible increaserepeat around. (18 stitches)
- Round 4:2 single crochets, invisible increaserepeat around. (24 stitches)
- Round 5:3 single crochets, invisible increaserepeat around. (30 stitches)
- Continue Increasing:Continue this pattern, increasing the number of single crochets between increases each round until the circle reaches the desired diameter.
- Rounds Without Increases:Single crochet in each stitch around until the beanie reaches the desired height.
- Finish:Fasten off and weave in ends.
FAQs About How To Make An Invisible Crochet Decrease And Increase?
How Do I Know If I’m Making The Invisible Decrease Correctly?
To ensure you are making the invisible decrease correctly, make sure you are only working into the front loops of the stitches and pulling through both loops cleanly. Practice on a swatch to perfect the technique.
Can I Use Invisible Decreases And Increases In Any Crochet Project?
Yes, invisible decreases and increases can be used in any crochet project where you want a cleaner, more seamless appearance. They are particularly useful in projects where the finished look is important, such as amigurumi, garments, and accessories.
Why Do My Invisible Decreases Still Show?
If your invisible decreases are still visible, check your tension and ensure you are only working into the front loops. Practicing on a swatch and adjusting your technique can help achieve a more seamless look.
Do Invisible Increases Create More Bulk In My Project?
Invisible increases can create slightly more bulk, but this is usually minimal. The goal is to maintain a consistent stitch pattern without noticeable gaps or holes. Proper tension and technique will minimize any additional bulk.
Can Beginners Learn To Make Invisible Decreases And Increases?
Absolutely! While invisible decreases and increases may require some practice, they are accessible to beginners. Start with simple projects and practice the techniques until you feel comfortable incorporating them into more complex patterns.
Conclusion
Mastering invisible crochet decreases and increases can significantly enhance the appearance and quality of your crochet projects. These techniques provide a cleaner, more professional finish, making them invaluable for various applications, from amigurumi to garments. With practice and attention to detail, you can easily incorporate these methods into your crochet repertoire. So grab your hook, yarn, and stitch markers, and start practicing these essential techniques to take your crochet skills to the next level.
Jump to
Understanding The Basics
Why Use Invisible Decreases And Increases?
Materials Needed
How To Make An Invisible Crochet Decrease
How To Make An Invisible Crochet Increase
Applications Of Invisible Decreases And Increases
Common Mistakes And How To Avoid Them
Practice Patterns
FAQs About How To Make An Invisible Crochet Decrease And Increase?
Conclusion

Buttskin Family
Author
The Buttskins are a crazy author family who love writing, laughter, and eating an unhealthy amount of junk food. Mom Rockita started scribbling stories as soon as she could hold a pen, and Dad John didn't realize authoring children's books was a real job until after they were married.
Their kids have embraced storytelling at an early age. Little Lucy, age 5, dictates her colorful tales about dragons and princesses to her parents. Her 8-year old brother Jake collects scraps of paper to diagram his latest imaginary adventure involving ninjas and dinosaurs.

Caden Steelheart
Reviewer
Caden Steelheart, an enigmatic author, weaves tales that immerse readers in the depths of sin city's underbelly. With his words as a weapon, he crafts literary masterpieces that reflect the dark and dangerous spirit of the city. Caden's writing captures the gritty essence of sin city, delving into the intricacies of its characters and the moral complexities that define their existence.
Born amidst the shadows, Caden draws inspiration from the relentless chaos and unforgiving nature of the city. His words carry the weight of experience, creating a vivid and haunting portrayal of sin city's undercurrents. Through his stories, he explores the blurred lines between right and wrong, exploring themes of power, deception, and redemption.
Caden Steelheart's literary prowess has made him a name whispered in literary circles, captivating readers with his ability to immerse them in sin city's intricately woven tapestry. With each written word, he invites readers to journey into the darker realms of the human experience, offering them a glimpse into the secrets and sins that shape the city's inhabitants. Caden Steelheart, a master of capturing the essence of sin city through his writing, continues to captivate audiences with his haunting and evocative narratives.
Latest Articles
Popular Articles